Better late than….

The funny thing is my son never exhibited much interest in football during high school. He was in the marching band and at his school that was the cool thing.  But when we moved to the Baltimore area, he had several friends who indoctrinated encouraged him in becoming a Ravens fan. Since we’ve moved from there, he is still a die hard Ravens fan. So I made this wall sign for him for Christmas and his birthday and another Christmas and birthday.

In the spirit of full disclosure, this project took me about two years from concept to full execution. It’s not that it was hard or even complicated, but I kept doing only a portion of the project and then coming back to do the next step months later. I know that’s ridiculous, but I just couldn’t seem to get it together. So, don’t worry that this is a difficult project, you just have to stay focused.

Supplies:

2 10×20 boards (deciding how big to make the boards is what took the longest time)

2 boards for securing the large boards together

screws

Gray stain (I recommend using latex gloves with this)

Paint brushes and plenty of rags.

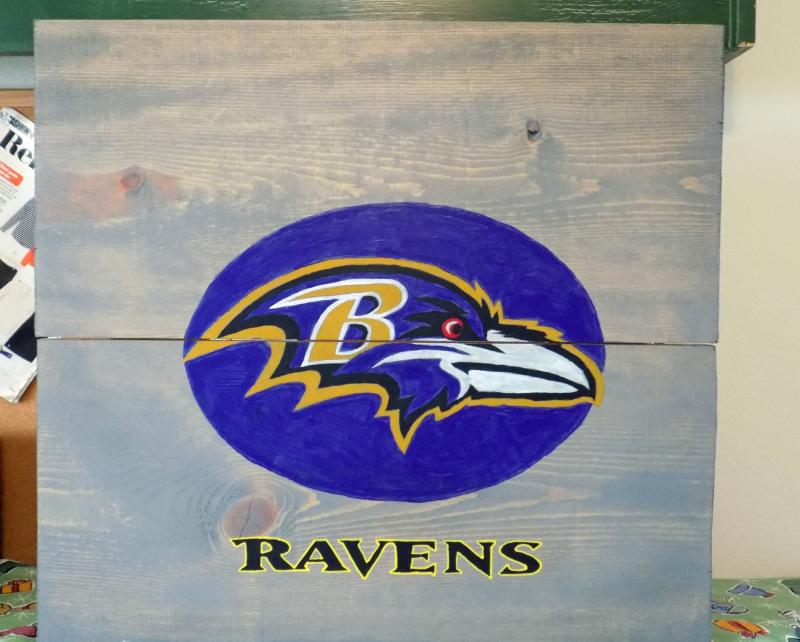
Acrylic paint in the team colors (look closely the image also contains black, white, and red)

Yellow paint pen

Miss Mustard Seed Furniture Wax in clear and the Antiquing wax.

To create the sign, my husband assembled the boards. Next, I painted the boards with a gray stain. This is a messy, messy process.Wear gloves or you will have lovely gray finger nails for a while (not that that happened to me).  I immediately wiped the stain off with rags so that the wood grain would show through. I wanted an aged wood look, not solid gray boards.


I found the image I wanted online and increased the size. And increased the size several times, taping pieces together until it fit the space.  Actually, I used  three images. I used one as a color reference and the second is a line drawing which made it easier to transfer the image with transfer paper. And the third helped me draw the oval shaped behind the Raven. I use a red ink pen for transferring. It makes seeing where you have transferred the image easier and helps avoid that one line you missed.

I painted in the image using acrylic paints and I outlined the word Ravens with a yellow paint pen. Believe me, that was much easier than trying to paint a narrow straight line with a brush.

After it had dried (and several weeks later) I wiped clear furniture wax over the entire sign and antiquing wax on the corners and edges. I don’t think you can really see much difference, but I noticed the wax helped the board color look less flat and brought out the wood grain more.

The final product appears more blue in the photo than it actually is. It really is Ravens purple.My original intention was to sand the image down to give it an aged look and put heavier antiquing wax over the whole sign. My son, though, wanted the brighter image so I left it as is.

Guess what’s coming next? Well, my husband and son-in-law are Redskins fans. So…maybe two years from now I’ll have them done. Better late than…

Thanks for reading,

Celeste

p.s. Due to all that NFL licensing stuff, an item like this is for personal use, not selling.


Oh, the humanity!: Chaos vs. Creativity


This was a hard post to write. I realized after I had spent time putting it all together that it is basically a post about cleaning a room. I told my husband that the topic is probably not very riveting. My problem, though, is I find it very difficult to be creative in a chaotic environment. How ironic, since by the time November rolls around each year my Art/Craft/Sewing room (it needs a name) is a certifiable disaster area.

Exibit A:

Where to put my feet?
Yes, that is a ceramic frog on the sewing cabinet. No, I don’t know why.

This room has been used to create oil paintings, Ghost Buster costumes, choir costumes, Christmas crafts, and acts as a general dumping ground throughout the year. These photos were taken near the end of December and I thought I would clean it up quickly, take a few photos, and post about how nice and clean I made it. That was over two months ago. Please notice I could not actually walk anywhere in the room. I couldn’t walk to the craft shelves, I couldn’t walk to the closet, I couldn’t walk near the art desk or sewing machine. This was not very conducive to creativity. Frankly, I avoided being in this room because it was like one of those obstacle courses on Ninja Warrior.

So, I began at one corner and worked around the room clockwise. I went through every cubby and drawer. Two months later I found the floor. In the process I disposed of three large garbage bags  of junk and filled the back of the car with Goodwill donations. I did not tackle the closet. Fiddle-de-dee, I’ll do that another day.

Now if you’re expecting the typical blogger post showing new flooring and fantastic storage solutions, sorry you’ll be disappointed. Nobody got no budget for that!  Perhaps I should title this post “How to make a Creative Space on No Budget”.  Yeah, tip one: clean the room.

Exhibit B:

I did make two physical changes to the space. This room gets very hot in the afternoons summer and winter. I changed the light weight floral drapes for some lined brown drapes that I had left over from my master bedroom.  Even so, you can still see that light is shining through the heavier drapes. Now, light is great for painting, but not when you have heat exhaustion. The best time to paint in this room is the morning. I’m at work most mornings, so I have to compromise on the light situation.

I also changed out the drapery rods from heavy, hand-made wooden ones to slimmer black wrought-iron look rods. This is what I have been changing all the rods to throughout my home.

Canvases all neatly stacked in the basket. I found the missing paper cutter!

Secondly, I bought a basket for my small canvases. They were just piled in a mess under the desk. This desk by the way is an old mechanics bench that I bought at a local antique mall. It is the perfect height for working on paintings and crafts. The metal drawer at the front is where I now store all my extra paint brushes. I usually stand to work here which is why the stool is on the side.

And yes, that is a plastic Christmas motif table cloth over the desk. Not beautiful, not chic. The desk has a beautiful wooden surface that I can’t stand to see get paint and glue on it and that’s my current temporary solution to protect it.

No tightrope walking. Ah, now I can walk to the shelves.

A room ready for more creative processes, and plenty of walking space to each area. No Ninja Warrior moves necessary. Space for more messes. Space for more creativity.

I still have a mental list of things I’d like to do to improve this room. First of all, paint and carpet don’t mix. I’d like a wood laminate floor. Next, I’d love to reveal the wooden desktop. I want a glass sheet for the top. Expensive! I also would like a solution for storing the large canvases, both painted and unpainted. Finally, it could use some major redecorating, but since new purchases for this room are not at the top of my to do list, it will be awhile before this can be accomplished.

Look, no long jump to the closet doors!

So now it is a place where I can create again. Wonder what it will look like in November!

Next post, I’ll show you more on the Baltimore Ravens wall plaque I made for my son. You can catch a glimpse of it on the desktop in the photo above.

Please take a moment and sign up for my newsletter so that you won’t miss a post.

Thanks for reading,

Celeste